ConcreteMix Pro
Help
This guide explains the main calculator functions and how to move saved project data between devices without using cloud storage.
Back to calculatorDashboard Step-by-Step Guide
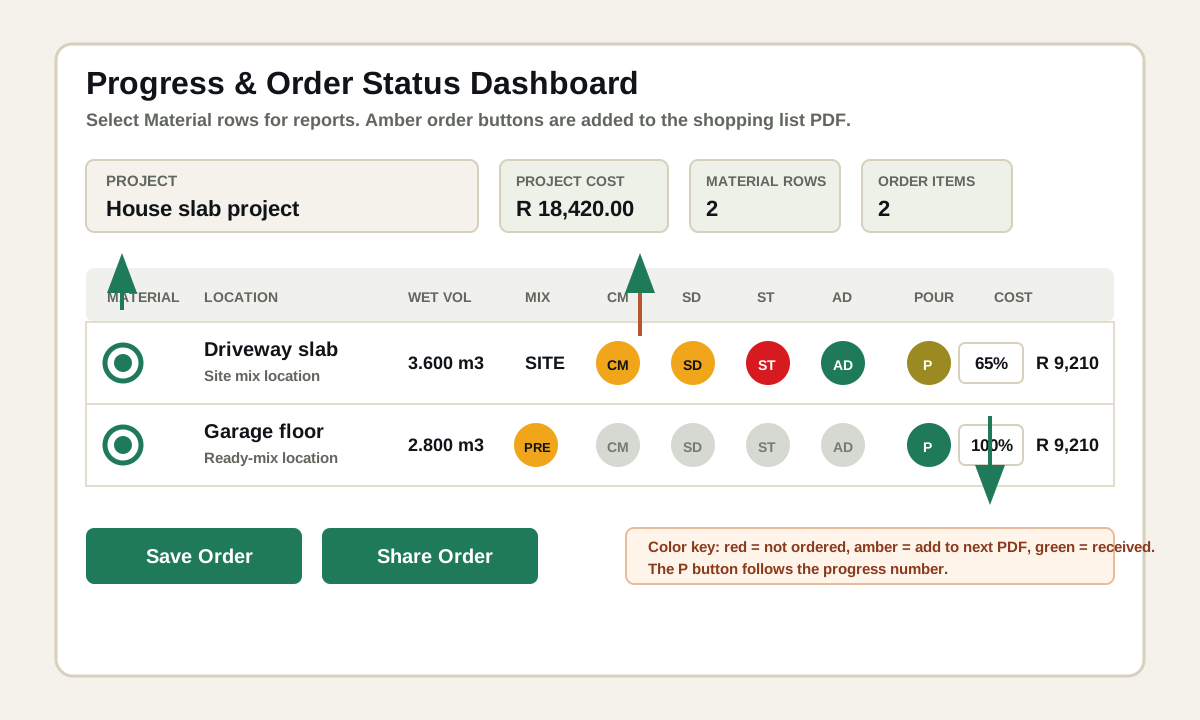
The dashboard is used for two jobs: tracking pour progress and making material order PDFs. The picture below shows the main controls.
1. Save the project and locations first
Example: create a project called House slab project. Then save locations such as Driveway slab, Garage floor and Patio. The dashboard can only list locations that were saved inside the selected project.
2. Choose the project
Use the Project dropdown at the top of the dashboard. The app then shows every saved location in that project with volume, strength, mix type, cost and progress.
3. Use the Material circle to choose report rows
Tap the first circle in a row to include or remove that location from the PDF progress/details section. Select all chooses every location. Clear removes all rows from that section.
4. Use CM, SD, ST and AD for site-mix orders
For site mix locations, tap CM for cement, SD for sand, ST for stone and AD for additive. Each tap changes the color: red means not ordered, amber means add this item to the next order PDF, and green means received.
5. Use PRE for ready-mix orders
For ready-mix locations, the PRE button replaces the site-mix buttons. Tap PRE until it is amber when you want the ready-mix volume added to the next order PDF. Tap again to mark it green after it was received.
6. Update the Progress percentage
Enter the actual pour progress from 0 to 100 percent. The P circle changes color as progress improves. Use 0 before work starts, 50 for halfway, and 100 when the pour is complete.
7. Save or share the PDF
If no material buttons are amber, Save and Share create a progress/details PDF from the selected Material rows. If any material button is amber, Save Order and Share Order create an order PDF using only amber items.
What Each Setting Does
- Project actual cost is the total estimated cost of all saved locations in the selected project.
- Material rows counts how many locations are selected with the first circle. These rows go into the progress/details section.
- Order items counts locations that have at least one amber material or PRE button. These are used for the shopping/order list.
- Select all marks all locations for the progress/details PDF section.
- Clear removes all Material row selections, but it does not change material order colors or progress numbers.
- The Cost column uses the saved cost settings for each location. Update costs in Settings before saving a location if prices changed.
Simple Examples
- Example 1: You need cement and sand for the Driveway slab. Tap CM until amber and tap SD until amber. Leave ST red if you do not want stone on this order. Press Save Order.
- Example 2: The cement has arrived. Tap CM again until it turns green. It will no longer be added to the next order PDF.
- Example 3: The Garage floor is ready-mix. Tap PRE until amber, then Share Order to send the ready-mix volume to your supplier.
- Example 4: The Patio is 75 percent poured. Type 75 in Progress. The PDF will show that the location is not yet complete.
- Example 5: You only want a progress report. Make sure no CM, SD, ST, AD or PRE buttons are amber, select the Material rows you want, then press Save.
Quick Start
- Type a Project Name and press Save.
- Enter a Location in project and press Save again.
- Choose the shape, unit and dimensions for the pour.
- Choose the purpose, strength, cement type and supply method.
- Open Settings to enter material prices, currency and project defaults.
- Use the Progress & Order Status dashboard to save or share PDFs.
Projects and Locations
- A project is the main job, for example a house, site address or building.
- A location is a specific pour inside that project, for example driveway slab, bedroom floor or beam over patio.
- Saved projects appear in the Project Name dropdown.
- Saved locations appear in the Location in project dropdown after a project is selected.
- The Save button near the top saves the current project or location values on this device.
- The dashboard can then show all saved locations for that project in one place.
Shapes and Dimensions
- Slab and beam use length x width x depth.
- Circle uses diameter x depth.
- Column uses diameter x height.
- Stair uses width, number of steps, rise and run.
- Custom lets you enter a known concrete volume directly.
- Changing units updates calculations instantly.
Mix for This Pour
- Purpose selects a practical concrete use such as slab, driveway, foundation, beam or column.
- Strength is saved with each location because different pours can need different MPa or PSI values.
- Edit ratio lets you change the cement : sand : stone ratio manually.
- Done closes manual ratio editing.
- Custom mixes can be saved under a user-defined purpose name for reuse.
- The displayed custom strength is approximate only and depends on cement, water, aggregate, additives, curing and site practice.
Site Mix and Ready-Mix
- Site mix calculates cement bags, sand, aggregate, water, additive quantities and material costs.
- Ready-mix prices delivered concrete by calculated volume plus wastage.
- Set the Ready-mix / m3 price in Settings, Cost.
- Ready-mix order PDFs show the delivered volume to order.
Materials and Costs
- Materials show cement, sand, aggregate, water and additive requirements.
- Costs show the material cost estimate for the selected supply method.
- Cement costs can be entered per cement type.
- Sand, stone, additive and ready-mix costs are set in Settings, Cost.
- Currency, unit system and strength unit are set in Settings, Global.
PDF Save, Share and Progress
- Save and Share in the dashboard create a PDF from the selected dashboard rows.
- Use the Material row selector to include locations in the progress/details section.
- Use the CM, SD, ST and AD status buttons to build the shopping list section for cement, sand, stone and additive.
- For ready-mix locations, use the blue PRE status button to track ordered and received ready-mix.
- When more than one order location is selected, the PDF shows each location and a combined material total to buy.
- If no saved project is selected, Save and Share use the current calculation only.
- Material status colors are red for not ordered, amber for on the order PDF/not received, and green for received.
- Only amber material items are added to the order list PDF.
- The Progress percentage tracks pour progress from 0 to 100 percent.
- P follows the Progress percentage color: red at low progress, amber in the middle and green at 100 percent.
- On Android, the app uses the native share sheet so you can choose apps such as Files, Gmail, WhatsApp or Quick Share.
Local Backup Transfer
- Export Backup creates one JSON backup file with saved projects, locations, settings, costs, custom mixes and saved calculations.
- Move the backup file by USB, email, WhatsApp, Quick Share or another method you choose.
- Import Backup loads that file into another device or browser.
- Import replaces the local ConcreteMix Pro data on that device after confirmation.
- No cloud account or backend database is used.
Settings and Data Clearing
- Material settings include bag size, wastage and water-cement ratio.
- Cost settings include cement names/prices, sand, stone, ready-mix and additive costs.
- Global settings include unit system, default unit, strength unit and currency.
- Data settings let you export/import backups or clear selected local data.
- Clearing selected data only affects the current device/browser.